Make A Rolled Beeswax Candle in Five Super Easy Steps
These beautiful candles are so easy to make, you’ll never want to buy them again.
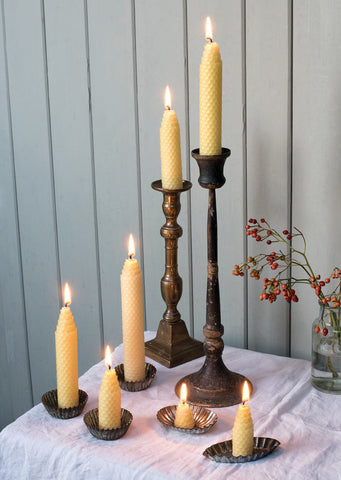
Turn beeswax sheets into homemade candles that will brighten any room and crank up the holiday cheer. Stylist, designer, and maker Emma Hardy provides these steps and photos using honey-coloured sheets but you can also try out any of the wide range of colours available at candle-making suppliers.
What you'll need to make a rolled beeswax candle:
- Sheets of beeswax
- Wick
- Cutting mat or scrap paper
- Metal ruler
- Craft knife
- Scissors
- Hairdryer (optional)
Important safety information:
- Never leave lit candles unattended.
- Always make sure that candle flames are away from other flammable materials.
- Keep out of reach of children and animals.
- Do not place lit candles near other heat sources.
- Candles should be positioned on flat surfaces and kept upright.
Remember: The tools used to create your beeswax candle are sharp and dangerous if not used correctly. They should be stored away from children. Yodomo holds no responsibility for any harm or injury caused by doing this course.
Step 1: Measure and cut the beeswax
Lay the sheet of beeswax on the cutting mat or scrap paper. Measure 1½in (4cm) into the bottom right corner and make a small nick with your craft knife to mark it. Lay your ruler on the wax sheet from the nick to the top right corner and cut through the wax to remove a triangle from the long edge. When rolled up, this side will be the top of your candle, creating a tapered look.

Step 2: Cut the wick
Cut a length of wick 1¼in (3cm) longer than the height of the wax and lay it along the longer of the two side edges of the wax.

Step 3: Rolling the wax
If your room is warm, then the wax sheet will probably be supple enough to roll, but if you are working in a cold room you may need to warm the wax sheet with a hairdryer for a few seconds to soften it slightly. Start to roll the wax sheet up over the wick, making sure that you press down slightly so that the wick is firmly held in place.
Tip: As you continue to roll the wax, ensure the bottom is flat and make sure the roll is quite tight.

Step 4: Seal the wax
Gently press the edge of the sheet down with your finger to seal the wax neatly.

Step 5: Trim the wick
Cut the wick off at the bottom of the candle, then trim the wick at the top to about ¾in (2cm).


And there you have it! Your very own hand-rolled beeswax candle. Make several and place them in antique candle holders to set a festive atmosphere, and enjoy some mulled wine or hot cocoa by their warm glow.
Want to make a soy candle instead? Access London Refinery's Make an essential oil soy wax candle Course + Kit and get everything you need to continue your candle making journey, delivered to your door.
This free project is a sample project taken from Handmade Candles and Smudge Sticks by Emma Hardy, in partnership with CICO Books.
Photography by Debbie Patterson © CICO Books.